http://webpages.krausonline.com/spaul/Trans.html
This transmission was used in all Auto trans equipped Front Wheel drive
Chrysler products beginning in the late 70's until 1989, when the New A
604 Ultradrive electronic 4 speed trans was introduced, and the 3 speed
was used less and less. The 3 speed is still used today in the Neon.
The transmission has been called by several different names, but they
are all basically the same transmission with minor changes to the case
to accept different engines as follows:
A-404 used with the 1.7 liter engine
A-413 used with the 2.2 and 2.5 liter engine.
Available with or without lockup converters.
A-415 used with the 1.6 liter engine
A-470 used with the 2.6 liter MMC engine
A-670 used with the 3.0 liter V-6 MMC engine,
came with the lock up converter.
It appears that the V-6 and turbo transmissions have 4 clutch disc packs,
Where the others only have 3 or less.
(note: Ihave found the above to be only a guide line! I have
found the 4 clutch pack in NA trans, and 3 clutch disc in Turbo Mini van
transmissions, so, as usual, nothing is a hard and fast rule.
A quick rebuild
I have went through a few steps for "freshening up" a transmission. I would strongly recommend buying the transmission rebuild manual from: (This book appears to be a exact copy of the transmission section of the Factory service Manual)
Automatic Transmission Service Group (ATSG)
9200 S. Dadeland Blvd.
Suite 720
Miami, FL 33156
(305) 670-4161 or 1-800-245-7722
I bought mine from J C Whitney. Go
here to order and get info.
You could also get the Factory service manual. I think it actually includes more info than the ATSG manual, but it is also much more expense than the $12.99 The ATSG book cost! Do not buy the Chiltons book on transmission repair for all domestic cars from 84 to 89. It is over 800 pages and includes step by step instructions on all transmissions except the 3 speed chrysler. It does have a large section on the 4 speed electronic 4 speed. I called to Chiltons to complain that they included a trans barely used in 89 only, but left out the main transmission used by Chrysler. You can guess what there response was.....
For good tech help, and the official cherry picker operator, tool boy,
and some times wheel chock (just kidding) I depend on my son Josh. his
web site is www.joshuapaulsmith.com
A short list of tools you must have
Chrysler uses 4 main bolt head sizes, 10 mm, 13 mm, 15 mm, 18 mm. You
must have these sizes in both deep and shallow sockets and wrenches.
You will also need a 8 mm socket for work on the transmission.
A 32 mm socket to pull the axles.
2 Jack stands and a floor jack. Also either another jack, blocking,
or one of those "over the engine" bars to support the engine while the
trans is out.
Regular and Phillips Screw drivers
A set of TORX bits. I use a "Eklind" fold out set, like the hex key
sets.
Pliers, Channel Locks, Vise Grips, hammer etc.
Electric drill and small (3 or 4 inch dia) wire brush wheel for it
(to clean off gaskets)
Feeler Gauge set
Supplies:
Several cans of Carburetor Cleaner for cleaning off parts
8 quarts of 7176 (ATF+3) Transmission fluid
Rebuild kit (got mine from the dealer $85--Mopar PART NUMBER 04798215AD)
RTV Gasket sealer
Other Parts I recommend if you plan to race:
4348679 pinion gear (spider, 2 reqd) $22.50 ea
4659502 gear diff (axle side gear, 2 reqd) $36.70 ea
4659142 Shaft pin (spider gear shaft 1 reqd) $10.70 ea
4412521, spider gear washer (2 reqd) $1.60 each
4504568 washer shim kit for diff (2 reqd) $9.90 ea
4800059-AA Bracket, pin retainer. (2 reqd) $4.20 ea
4539123 or 4539124 snap ring for clutch pack, $3.00 ea
Anyway, step one: Pull the transmission. Below are some notes:
First--- Take the car to a spray car wash and really clean the transmission well. It should be almost sterile when you open it.
You must pull both axles. Not too bad, Go here for instructions on pulling axles
The flywheel bolts to the torque converter only one way. One bolt hole is off center. It is the slotted bolt hole in the fly wheel. In order to easily realign the converter to the flywheel when you put the trans back in, you should mark the two before you unbolt them. As soon as I pulled the dust cover, I sprayed some spray paint up in there on the flywheel and converter to mark them. The converter will have a circle stamped next to the odd bolt.
You must raise the vehicle and put in on jack stands! No exceptions! Do not even consider crawling under the car without it being securely held up. Before you are through with this "transmission remove and replace", you will have pulled, pushed, pryed, cussed, and done everything you can to knock the car off a regular jack, so don't try it. I place my jack stands under the K frame, behind the engine so they don't interfere with access to the front.
I have lowered the trans with a floor jack with a board between the jack and trans pan, but I prefer to use a engine lift crane (Cherry Picker) and lift the trans from the top and lower it down to the floor from above. Easier to lift back up into the car with picker too. There is a threaded bolt hole close to the timing access hole that I bolted the chain to. This puts the transmission at about the right angle to mate to the engine.
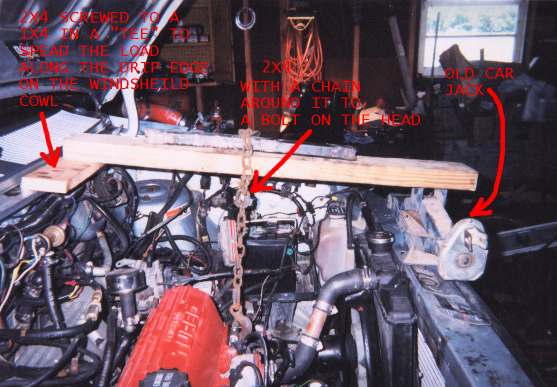
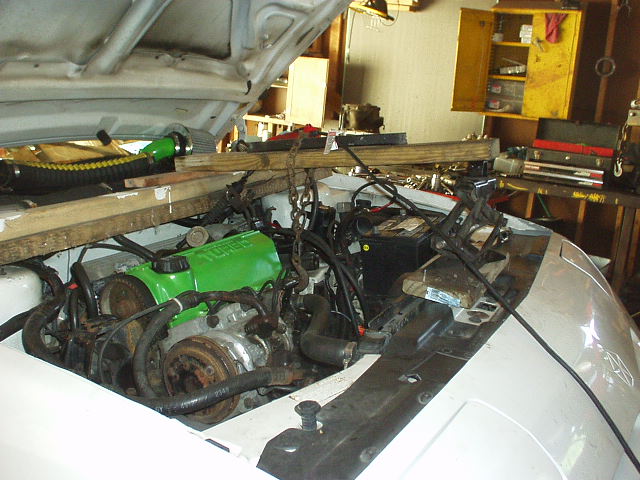
You must support the engine before you disconnect the transmission. I just put a jack under the oil pan with a board on it to keep from denting the oil pan, or build a cross bar like this (Click here)
The front motor mount can be left attached to engine block (two bolts) but I had to loosen them for realignment when I put the trans back in. The drivers side mount has 3 bolts to the trans, and one long bolt through the mount. Take out all four bolts so the mount is completely separate form everything
The Starter must be pulled, so disconnect the battery! The starter has 2 bolts and one nut on a stud. All three require a 15 mm socket. One bolt and the nut can be gotten to from the top of the transmission. The last bolt must be removed from underneath, and is a bitch. Period. It is also 15 mm, and let me tell you, get a ratchet wrench to take this one out. A normal wrench cant get much stroke, and you cant get a ratchet on it.
Transmission fluid should be drained before you start. It will run out of the axle holes at the worst times! (like when you are under it) You pull the pan to drain the fluid. Put the pan back on after draining it to protect it.
Step by step from memory:
After you remove all the air cleaner and crap out of the way so you can get to the bell housing bolts:
1. break loose lug nuts and disconnect the battery.
2. lift car and put on jack stands
3. remove tires
4. Drain trans fluid (10mm)
5. loosely replace the pan
6. remove the axle
nuts (some one to step on the brakes) ( 32mm socket required)
7. remove ball joint
clamp bolt (15 mm socket, 18 mm open end wrench)
8. Remove a total of 4 sway bar bolts on the a arms only (13 mm DEEP
socket and 13 mm wrench
9. swing down sway bar, and push loose ball joints (use a pry bar if
you have to)
10. pull axles (go
to my axle pulling page for details and pictures)
11. support the engine (see
engine support I made for my mini van) or (engine
support for a Daytona)
now get under the car:
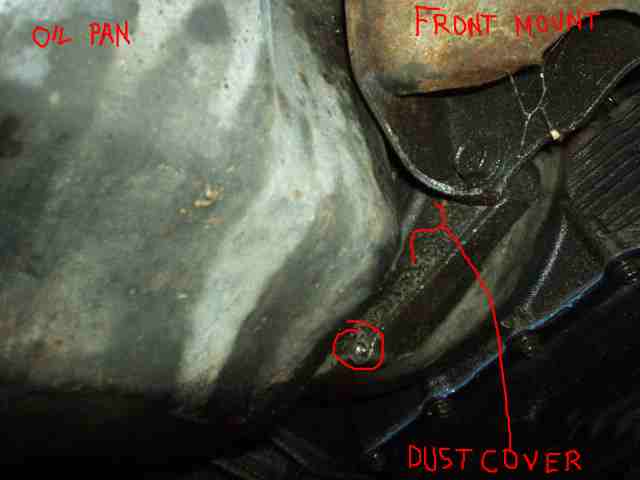
12. remove 4 torque converter bolts 18 mm. You must remove the dust
shield from the bell housing to gain access.
13. remove 2 bolts on the back of the trans below the starter (18 mm)
14 . remove the speed
sensor (10 mm)
15. remove the one 15 mm starter bolt (behind the engine, above the
axle, pain in the ass)
16 pull the starter back out of the way. (if you havent disconnected
the battery, now would be a good time)
17. remover the 2 bolts on the front motor mount, to the trans bell
housing (15 mm and 18 mm)
18. disconnect the cooler hoses and electrical plug
you are done underneath! get your ass back up and work on the top!
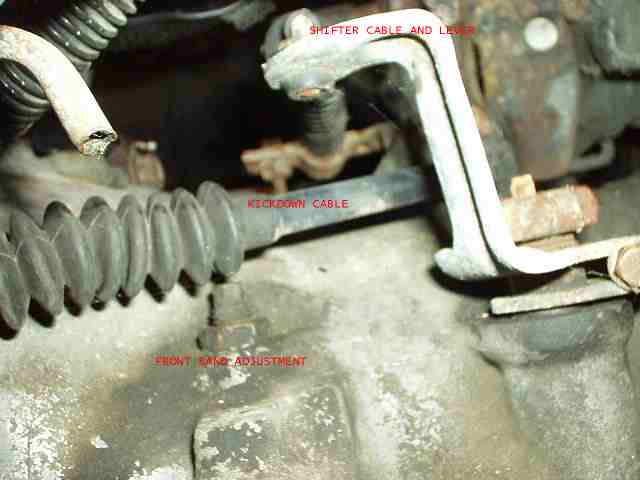
19. remove the shifter
cable and kick down cable (if equipped)(13 mm). It just pops out of
the arm.
20. Attach a Cherry picker to the top bolt hole in the trans close
to the timing window
21. remove the 3 short bolts and one very long bolt from the drivers
side motor mount. (15 mm)
21. remove the last two bolts on the top of the bell housing (18 mm)
22. its loose! Don't drop it!
I have done this in my normal garage, with normal tools in just under
two hours. It is not that hard, really!
Install in reverse order.
How it works (simplified)
The basic driving parts of the transmission that control which gear
you are in consist of two "clutch packs", and two "bands" These act
upon a planetary gear set which give you three forward and one reverse
gear by stopping (or turning) the different gears in the planetary set.
Which gear is which speed is not that important.
The clutches are in "drums", and the band wrap around and squeeze the
drums. If the clutch is compressed, power will travel straight through
the assembly. If the band is tightened, the drum cannot turn. The
drums are attached to the ring gear, and the front clutch pack is attached
to the rear clutch pack.
Difficult to explain, but the point is, through different combinations
of clutch and band engagement, the gears are shifted.
IN "DRIVE":
In 'first" gear, The rear clutch is engaged, everything else is loose.
In "second" gear, The rear clutch stays engaged, but at the shift to
second, the front band tightens on the front clutch drum.
While in second gear, the rear clutch and front band are tight. At
the shift to third, the front band loosens, and the front clutch tightens.
In third gear, both clutches are tight, both bands are loose.
In reverse, the rear band tightens, along with the front clutch.
From the above we can see the following:
The only time the rear is "engaged" is when the shifter is moved to
D. It remains engaged in all forward gears. If yours is slipping in all
forward gears this could be the problem. I would guess this is the "neutral
drop damage clutch"
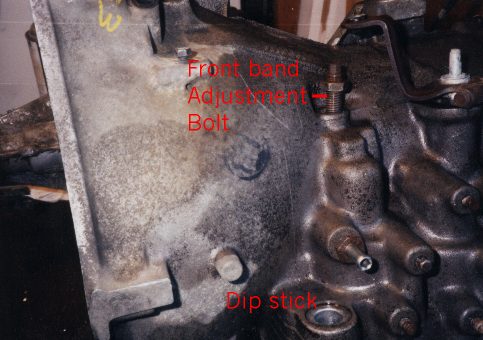
A loose 1-2 shift could be a loose front band (adjusted outside the
case)
A loose 2-3 shift could be worn front clutch disc.
The 2-3 engine flare up is caused when the front band lets go faster
than the front clutch engages. The clutches are not 'self adjusting", so
the more they wear, the longer the stroke to tighten them. The longer the
stroke, the longer it takes to shift.
Any problem can be caused by dirty fluid or a filter. I will not discuss
change intervals, but before you decide on a rebuild, pull the pan, look
around, and put in a new filter and fluid. You may be surprised at the
improvements!
"On the table"
If the transmission is not clean, clean it.
If you pulled the pan to drain the fluid, and it was full of metal
parts or shavings, I would consider getting a new transmission. You may
discover the cause of the metal, but it will be difficult to clean completely,
especially the converter. This will cause shifting problems with the valve
body and governor.
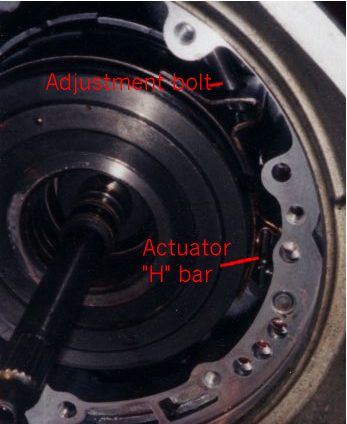
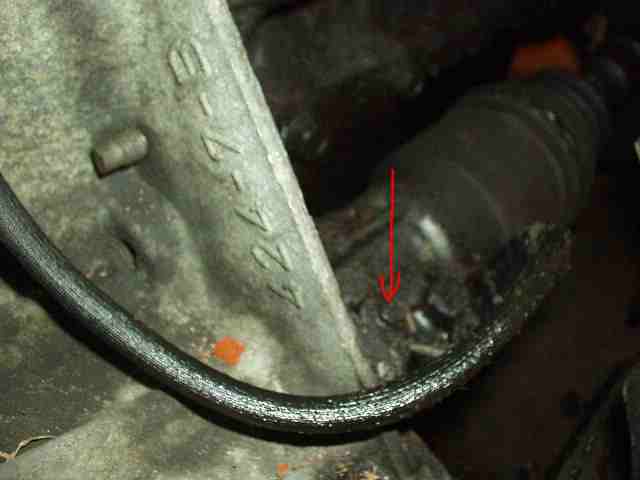
First, temporarily tighten the front band adjustment bolt. this will
hold everything inside the case while you pull the front pump.
The picture shows it very loose. you must tighten it pretty snug.
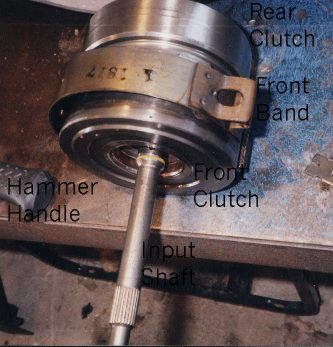
Pull the pump out the bell housing
I used two 3/8 bolts about 6 inches long, and pulled them out with
a hammer.
Two of the bolt holes a threaded so the 3/8 bolts thread into them.
They are actually metric 10 mm bolts, but regular 3/8" bolts will work,
just a little loose.
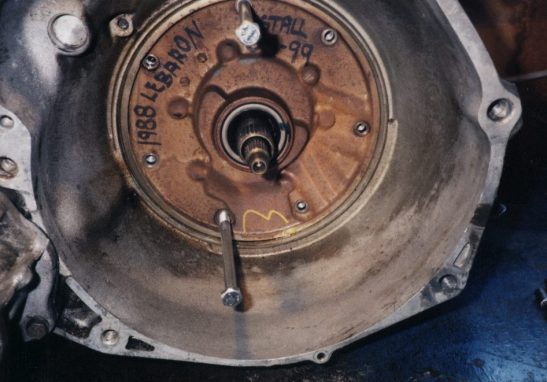
(I have went through so many transmission I "label" what they came
out of and the date I put it in)
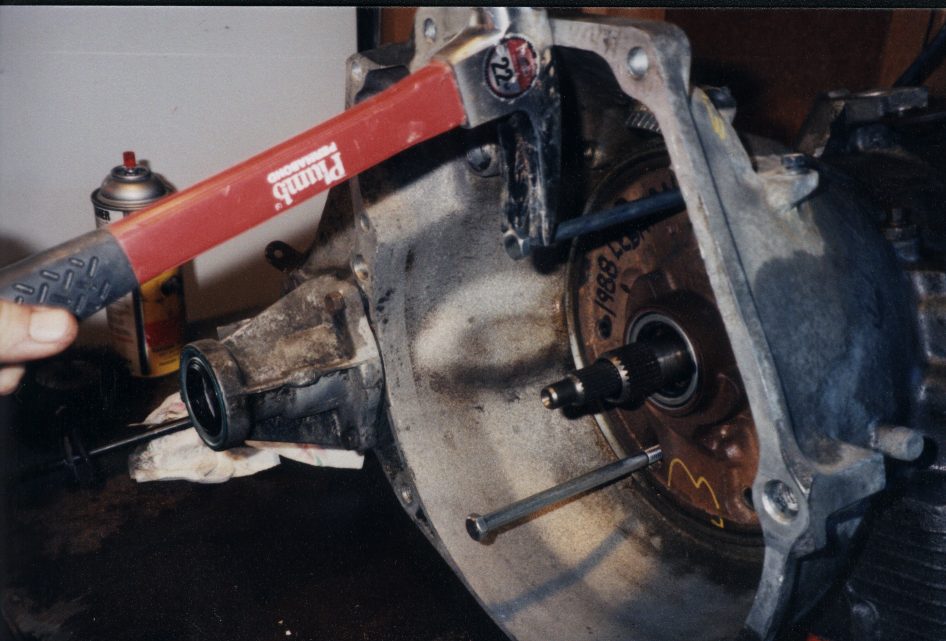
The pump actually comes out pretty easy. You can almost pull it out
just by grabbing the 3/8" bolts,
but I used a claw hammer for a little leverage.
After the pump is out, loosen then front band bolt again so you can
get out the clutch drums and the front band.
When you loosen the adjustment bolt, the small "H" bar will fall out,
probably into the pan.
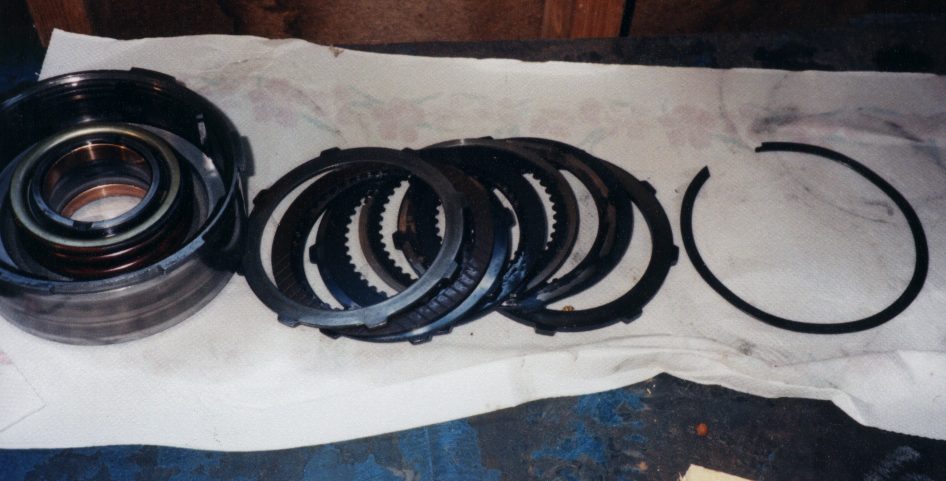
Here are the parts as they came out:
![]()
My kit did not come with replacement bands, and mine looked ok
to me. I don't think they wear
out too often. I just left my rear band installed. This as far as I
took down the clutch and gear
section of the transmission. My gears worked ok, it just slipped in
gear.
The front and rear clutch drums slide off each other, and the input
shaft.
To replace the clutch plates, just remove the snap ring:
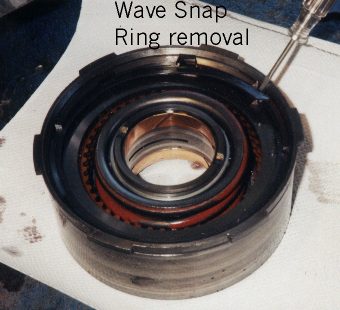
They come out in alternating between the clutch disc and the steel.
Pay attention to
the order they come out in.
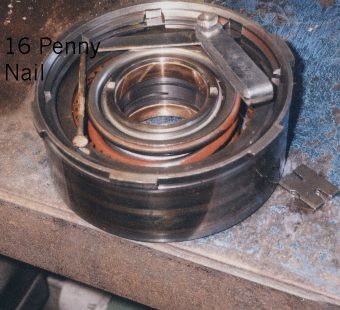
This is how you check the clearance. Mine was LOOSE!
I could stick a 16 penny nail in the gap! The "H" bar is next to the
clutch drum.
You should check the clutch clearances before and after installing
the new plates.
The performance snap rings #4539124 is about .110 thick and #
4539123 is about .097 thick.
You want about 40 to 50 thou clearance. Set the rear clutch at the
low limit
on the spec too. I always seem to use the .110 thick ring. Do not reuse
the "wave" washer you took out.
>CLICK HERE
TO SEE THE DIFFERENTIAL PAGE<
A MUST
SEE!!!!!
Click Here
for Valve body Removal and adjustment:
(includes
info on the manual valve body)
CLICK HERE
FOR TRANS REMOVAL DETAIL PICTURES
(Always Still under construction.)