First, let me say that Ma Mopar did not make this as clear as it could
have been. Some sort of a
better reference pointer could have been made to check timing, but
as that is not the case, the following will have to do.
Step 1.
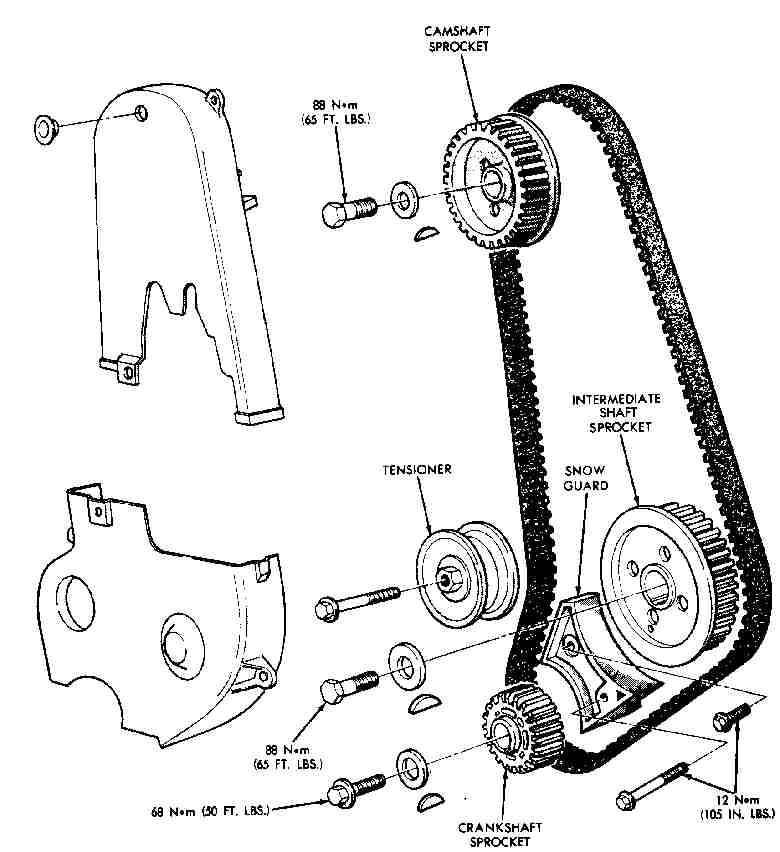
Take the 2 small 10 mm nuts off the plastic top of the cam belt cover.
These nuts are located on
the 2 valve cover bolts on the far right (passenger side) of the valve
cover. Remove the small 10 mm bolt that is on the face of the cover that
holds the two halfs of the cover together. Pull, lift and work this cover
off the top of the Cam belt. Skip this step if you can easliy find
TDC on your engine. I found that is was easiest to look at the cam as the
engine was turned.
Step 2.
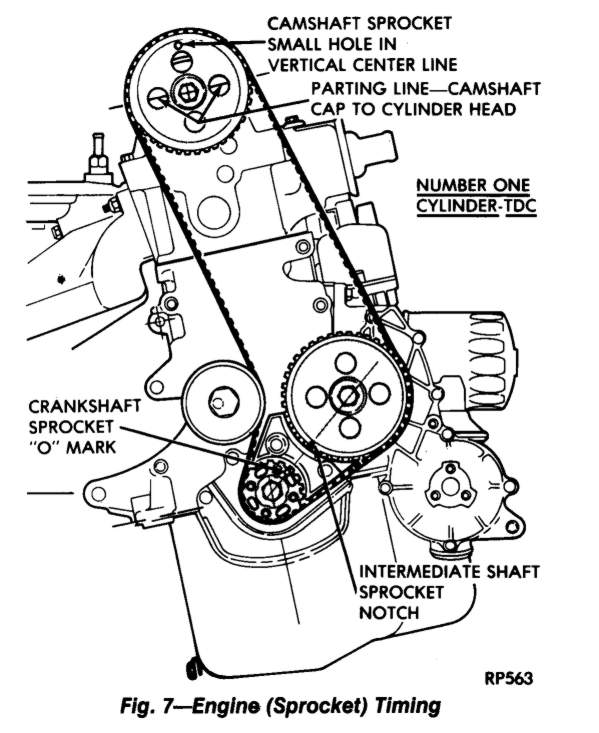
The Cam belt sprocket is full of holes. The number of holes is
not important. All the holes are the same size except one, which
is smaller. Two of the large holes will have small arrows pointing
to them. The engine must be turned so that the one small hole is
on top. The engine should be turned using a socket on the crank pulley
center bolt. I got lucky and could turn my engine by grabbing the
Air Conditioner pulley with my hands. You must not turn the engine
by turning the Cam or cam Sprocket.
Step 3.
As you get the small hole in the cam sprocket towards the top, start
looking in the small "window" in the Transmission bell housing where you
would normally set the timing. This window should have a degree scale
cast into it. "0" is towards the front of the car, and I think around "20"
is at the back of the window. As you turn the engine, and the small
cam hole is near the top, start turning the engine small amounts until
you see the notch cut in the flywheel appear in the window. Carefully
turn the engine until the mark, or notch is lined up with the "0" on the
Bell Housing window scale.
Step 4.
When you have finally positioned the flywheel mark exactly on the "0"
, you have found the:
Top dead center referred to often time in manuals and
other tech articles. This is actually when the number one piston
(passenger side) is at the top of its stroke on the power stroke.
This is the point when no. one cylinder should fire. Remember this,
It is often the point you must have the engine in to do many types of service.
Step 5.
The small hole in the cam should now actually be leaning back towards
the rear of the car a little. Actually, if you could draw a line straight
up from the crank to the center of the cam, this small hole would be in
that same line. I found this to be very a subjective way to check
timing, as this line seemed to be different depending on where I was standing.
So look, but don't depend on the eyeball approach.
Step 6.
I put the plastic belt cover back on and after confirming that my flywheel
mark was still on "0" .
Before I reinstalled the belt cover, I popped out the small round access
plug out of the cover
(about the size of a Quarter). After the cover was back on, I
got a small mirror and looked thought the access hole at the small hole
in the cam sprocket. This hole should be exactly in the center of
the access hole in the belt cover. I even stuck a small pencil in
the cam sprocket hole to confirm that it was perfectly in the center of
the hole in the belt cover. Even this method should only be used a a rough
check as the plastic cover could be distorted or something, so the hole
in it may not be right.
Step 7.
If the holes are not perfectly lined up, or you are not sure, (like
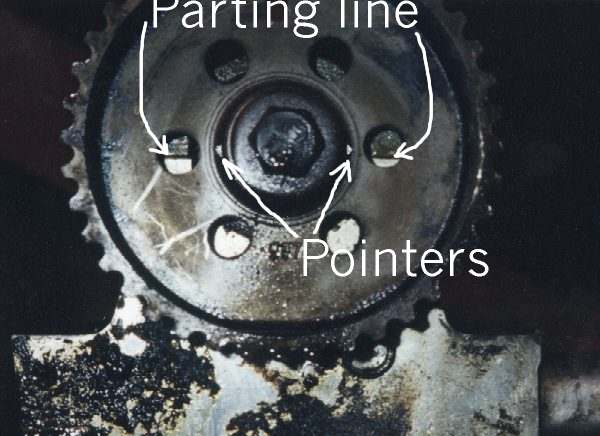
me) you must remove the valve cover. After the valve cove is removed, look
through the 2 large holes in the cam sprocket which are marked with arrows,
and make sure that the parting line (the machined surface the cam bearing
cap sits on) is in the exact center of both holes in the cam sprocket.
You must use a mirror to see exactly through the holes in the sprocket.
In my case, the line was a little high looking through one hole, and a
little low in the other hole. My cam was off one tooth.
I must add on point: I have been told that there is a line on
the valve cover of NA Engines that is in the same place as the cam bearing
cap parting line, and can be used instead of pulling the valve cover.
I have not seen one of these, so cannot comment on this mark.
Moving the belt is another story.......
Back to TURBOVAN!
Back to Main Page